Well, once again Mother Nature had other plans for us! The barn building is still on hold, while we clean up from Hurricane Matthew. We were extremely lucky here.....just a lot of rain and wind. Limbs down, wet everywhere, but no major damage (thank goodness!). Animals and humans are all fine. This blog would be a good time to review what to do for your animals in an extreme weather event, such as a hurricane.
When you are faced with a weather event, you have to weigh a lot of things, to see where your animals will be the most protected. Do you leave them inside? Do you leave them outside? Do you evacuate them? Etc, etc, etc.
When you are considering your options, take into account the stability of your barn, if there are trees or potential debris that might come down (like electric wires) during high winds, is the shelter on high enough ground that it won't flood, what is the likelihood of flying debris that might hit them, etc.
If you decide that the animals would be safer inside, be sure to give them plenty of water, hay and bedding, in case you can't make it back to the barn for a day. If you decide to leave the animals outside, they will need the same access to water and hay or grass. Be sure if you do leave them outside, that they have identification on them, in case fences come down and they get out. If you leave a halter on them, be sure it is a break-away halter. These halters are designed to give way, if the horse catches them on a tree branch or some such thing. The halters are to break first, instead of injuring (or killing) the horse. Perhaps put a fly mask on your outside horse as well, so it will help keep the wind from blowing dirt into the horse's eyes and/or ears.
You can also use a neck tag/strap for identification. These are like the neck straps you would see on cattle....they work on horses too. You can write on them with a permanent marker. Put your name and phone number or your vet's phone number on the straps. That way if your horses do get out, when someone finds them, they will hopefully still have the strap on, so you can be contacted. Here's just one link to this type of product. http://livestockconcepts.com/en/identification/2969-ritchey-15-neck-bands.html
If you have a well that supplies your water, be sure to fill up as many water tanks/buckets as you can, in case you loose power (wells won't work without electricity to them). This way you can water your horses until the power comes back on. Have plenty of hay on hand as well. We've found if our horses have hay to munch on, that keeps them busy and they don't fret about high winds as much.
Make sure your emergency first aid kit for the animals is up-to-date and stocked. Have blankets and towels on hand. Better to be over prepared, than not prepared enough!
If you are thinking about evacuating your horses, have a plan on where you are going first. Call ahead and find a stable that you can shelter in. Make reservations for your horses, just as you will for yourself at a hotel. If you have more horses than you can fit into your horse trailer at one time, take that into consideration as well. Do you hire someone to haul them for you? Remember, there may not be someone available to do this for you. Can you make several trips to move the horses? If so, start early and don't wait until the last minute to move them! Better to have moved them early and end up not needing to evacuate, rather than waiting until the last minute and having a mess because you get stuck in traffic of others trying to leave or you need to make more than one trip and the weather turns too dangerous for you to haul a trailer, so you can't go back and get the 2nd load and so forth.
This brings up some other ideas you should have in place on a regular basis. Check your truck and horse trailer tires regularly. Check your horse trailer floors for safety. Do normal maintenance on these vehicles, so they are ready in case of emergencies. Keep a binder of current coggins tests for ALL of your horses, not just the horses that leave the farm routinely. You never know when you may have to haul one to a vet in another state and would need a negative coggins to cross state lines. In that same binder, keep printed out directions to the most frequently used horse emergency vet locations. Your GPS may not work and having printed driving directions will take some of the tension out of an emergency situation. Also keep a printed out version of your horse's health history, including vaccines, wormings, etc. in that binder.
Of course these ideas can be used for all livestock, not just horses. Hopefully you will never need to implement any emergency responses. We send our thoughts and prayers to all affected by hurricane Matthew.
Next blog will be posted on Halloween Day.....Oct 31st. That blog will give you an interesting look into our 186 year old house that we live in!!
Wednesday, October 19, 2016
Monday, October 3, 2016
A new arrival on the farm!
This blog was to continue with our barn building adventures. Well, Mother Nature has had other ideas the last week or so here! We've had rain for the majority of the week (much needed rain, I might add), so our barn build has been delayed. There's never a lack of activity around here though. I'll take this blog space to introduce you to our newest family member, instead. Mini Gaits Midnight Wardance, aka Night, has arrived!
He's a weanling miniature black and white pinto stud colt. He will be one of our herd sires in the future. He's registered both AMHA and AMHR. I'll be getting him triple registered as a pinto also. He is homozygous for tobiano pinto, meaning he will ALWAYS produce a pinto foal, no matter what color the mare is that he is bred to! Yippee!!!! We like our spots around here. <big smile>
We love, love, love his laid back attitude towards life! He just takes things as they come and doesn't get upset about anything. His turn-out buddy is our weanling colt Rebel. We thought they would tear around the paddock and might need a babysitter.....not so, not so! LOL You lead them out, turn them loose and they settle right down to the task of eating grass! No nonsense at all! LOL
He has old, respected bloodlines that should compliment future daughters of our current stallion Little Kings Buckeroo Aladin. Night is sired by Willow Creeks Thunder By Wardance, who is a direct son of Flying W Farms Little Wardance (who is the AMHA 1997 Amateur Senior Stallions National Champion and the AMHA 1998 Senior Stallions Open Over 32 to 34 National Champion). Night's dam is Mini Gaits Night Angel, a double granddaughter of SC Rangers Nightrain. SC Rangers Nightrain is a grandson of both Flying W Farms Little Blue Boy (He is the 1981 AMHA World Reserve Grand Champion Senior Stallion. He was also the Leading AMHA sire at the time of his death and a true legendary sire. He's also the sire of many AMHA World Champions.) and SC Rangers Nightrain is also a grandson of Roan Ranger (the Shetland pony who is a son of Gold Melody Boy).
View his full pedigree here.
Night is put together very well indeed! Short backed, excellent legs, nice set on neck, pretty head, good bite, good tail set, nice croup, etc. We are extremely happy with him and look forward to his future foals! He'll stay at home to grow up for a few years, then he will go to our trainers to see what he can do in harness. With his 4 flashy white stockings and black body coloration, coupled with his laid back personality, we think he will make a lovely parade candidate for us too!
Hopefully the next blog will continue on with our barn building, Mother Nature willing! Enjoy the beginning weeks of fall everyone!!
He's a weanling miniature black and white pinto stud colt. He will be one of our herd sires in the future. He's registered both AMHA and AMHR. I'll be getting him triple registered as a pinto also. He is homozygous for tobiano pinto, meaning he will ALWAYS produce a pinto foal, no matter what color the mare is that he is bred to! Yippee!!!! We like our spots around here. <big smile>
 |
| Night, shown at just 6 days old! |
 |
| Night here on the farm, with his new best friend Rebel! |
We love, love, love his laid back attitude towards life! He just takes things as they come and doesn't get upset about anything. His turn-out buddy is our weanling colt Rebel. We thought they would tear around the paddock and might need a babysitter.....not so, not so! LOL You lead them out, turn them loose and they settle right down to the task of eating grass! No nonsense at all! LOL
He has old, respected bloodlines that should compliment future daughters of our current stallion Little Kings Buckeroo Aladin. Night is sired by Willow Creeks Thunder By Wardance, who is a direct son of Flying W Farms Little Wardance (who is the AMHA 1997 Amateur Senior Stallions National Champion and the AMHA 1998 Senior Stallions Open Over 32 to 34 National Champion). Night's dam is Mini Gaits Night Angel, a double granddaughter of SC Rangers Nightrain. SC Rangers Nightrain is a grandson of both Flying W Farms Little Blue Boy (He is the 1981 AMHA World Reserve Grand Champion Senior Stallion. He was also the Leading AMHA sire at the time of his death and a true legendary sire. He's also the sire of many AMHA World Champions.) and SC Rangers Nightrain is also a grandson of Roan Ranger (the Shetland pony who is a son of Gold Melody Boy).
View his full pedigree here.
Night is put together very well indeed! Short backed, excellent legs, nice set on neck, pretty head, good bite, good tail set, nice croup, etc. We are extremely happy with him and look forward to his future foals! He'll stay at home to grow up for a few years, then he will go to our trainers to see what he can do in harness. With his 4 flashy white stockings and black body coloration, coupled with his laid back personality, we think he will make a lovely parade candidate for us too!
Hopefully the next blog will continue on with our barn building, Mother Nature willing! Enjoy the beginning weeks of fall everyone!!
Monday, September 12, 2016
Do you need more stall or storage space?
When you live on a farm, you can NEVER have too many barns, run-in sheds or storage areas. We are at the place where we needed another small barn or run-in shed. We've added another paddock this year near the main barn, where we turned out a mare and foal for exercise. We thought it would have been very nice to have a shelter in that paddock for them, so if a sudden rain storm came up, they could get in without us worrying about them and running like crazy to the barn to get them inside!
So....we started out with the idea to just build a small 12 x 12 run-in shelter. On reflecting about the use of that, we decided to make it a bit larger and go with a 12 x 30 small barn instead. There will be room for 2 stalls of 12 x 12 size OR 4 stalls of 6 x 12 (mini horse) size OR 1 large run-in area of 12 x 24 size, OR a combination of those sizes, with a solid walled 6 x 12 feed room. The stall area will be divided off by gates and/or round pen panels, so the entire stall area can be rearranged to meet whatever current need we have for it! It will be perfect for weaning the mini foals in. Perfect for 2 full sized horses to spend the nights in. Perfect for storing shavings/sawdust in, etc. The uses are numerous!
We also decided to tackle this build ourselves. Since it was a small shelter, we figured it was within our abilities. The blogs for the next few entries will reflect this building journey and I'll share the path that we chose to go down on putting up this addition! Perhaps it may give you a few ideas for your own run-in shed or small barn!
The first thing you need to do, is check with your county and see if a building permit is needed. In our county, if it is a barn/farm building, then no building permit is needed. Then we drew out our planned building on paper, with lengths noted, post heights noted, etc. This allowed us to make a shopping list for our supplies.
We began with marking and digging the holes for our support posts. Since the internal stall structure will change with need, we opted for more posts than just the basic support posts. We wanted extra posts to secure divider panels to, etc. Before you dig, make sure there are no underground utilities in the area! Often times people forget about where their electric or water lines to the barn are located!! Make sure you are well clear of those areas before you dig your post holes!! We put in the posts, made sure they were straight, tamped some dirt around the bottoms and then put in a bag of quickcrete in each hole. We put the quickcrete in dry and added water to the mixture after it was in the hole. We then let those posts stand quietly and the concrete dry for several days.
After the concrete was dry, we put up our brace boards between all the posts. This was a bit of a challenge! We wanted the front posts to be 6 inches higher than our very back posts, to give us a 6 inch drop for water to run off the roof. (That small of a drop is fine for our area....we get very, very little snow each year! In snowy areas, you'll need to check with your local builders to see what they recommend for a roof slant.) You would think that by leveling each brace board that goes between the posts, that you would have a square and even design. Unfortunately, that did not happen for us! I have a suspicion that it has to do with the fact that our ground is not perfectly level to begin with!
So my best advice, would be to put your brace boards across the front posts at the height that you would like them to be at and then level each of those boards. Then place a temporary board between the front post and the next post back. Level it and mark the top of that brace board (for us, this was our middle post). Measure down the correct distance and mark where the top of the board should be placed. Then repeat that procedure for the next line of posts back, etc. For instance, in our case, we had 3 lines of posts. Front, middle and back. Our front posts were 9 feet 6 inches high. Our middle posts should have been 9 feet 3 inches high. Our back posts should have been 9 feet even. This would give us our 6 inch slope for our roof line. You would think just measuring each post the correct height and then placing the brace boards at the top of each post, SHOULD have been the easiest way to achieve our slope! It was NOT!!! Again, I think the fact that the ground was not perfectly level, was the reason it didn't work the way we thought it would. So....this alternate method worked and our roof slopes fine.
Then we needed to cut off the posts to the correct heights. You can do this before or after you place the brace boards up....it's up to you and how comfortable you are with your cutting device! We opted to mark the posts with the brace boards held temporarily in place. We placed them at the desired location and ran a marker across the post, along the top of the board. This marked our post with the proper slope we needed to cut it at. Then we used a chain saw to cut the tops off the posts. It was pretty accurate and was a MUCH faster way than using a circular saw for this task!
After the tops of the posts were cut off and the brace posts attached, it was time for the rafters. We used 2 x 4 treated lumber. We opted to lay them flat, with the 4 inch width against the brace posts, instead of having them on end. We did this for 2 reasons: we didn't want as much air/vent space at the top of the rafters and we wanted more of a surface to nail our OSB boards to. We left a 3 foot overhang at the front of the barn and a 1 foot overhang at the back. This will hopefully keep rain from blowing into the front of the stall and keep it from dripping directly down on the back of the barn.
With all of the rafters in place, it was time for the OSB (like plywood) to go up. We opted to put this up along with the metal roofing, in order to insulate the barn a little bit. Having the wood underneath the metal roof will help to keep the barn a bit cooler and will also help to greatly reduce the noise when it rains! Since there will be young horses kept in this barn often, we wanted it as quiet as we could get it during storms.
We used 2 sheets of the OSB board to make up one row. We placed it long way from front to back. This gave us 16 feet of roof to cover. (12 feet of stall area, plus 3 foot overhang in front and 1 foot overhang at the back.) We did have to cut some off of the side, as it didn't come out to be a perfect fit that way.
Once the OSB boards were all in place, we put on the black roof paper, to seal the roof against moisture. We rolled it out across the roof going left to right (so going longways on the roof). We overlapped each row by about 3 inches. Each row was also stapled in place. We opted for the stronger paper....so when we walked across it, it held up and wouldn't tear.
On each end, we left about 2 or 3 inches hanging over and stapled that down also.
Next step was to add the drip edges. We used 10 feet long drip strips, letting them overlap slightly in the middle and used roofing nails to attach them to the topside of the roof. On the ends, we bent the edges around the corners, to protect the corner boards as shown.
Now it was time for the metal roofing to go up! For easier handling, we chose to use an 8 foot piece of metal and a 10 foot piece of metal, to make up one row (front to back). These smaller pieces were easier for us to transport and handle, rather than going with a 16 foot long solid piece!!
We did overlap the 2 pieces in each row by a couple of feet. We also allowed the metal to slightly hang over the edges of the OSB board in the front and back by a couple of inches. The screws we used to attach the metal sheets have a washer on them, to help seal the screw holes against water.
That completes phase 1! Yeah!! It's nice to have the barn under roof. Next phase is putting up the metal sides. That will be covered in the next blog, coming out on September 26th. A word of caution....when you are working on a roof.....never do that alone! Always have someone with you, even if they are on the ground, for safety! Take care!! Until next time.....
So....we started out with the idea to just build a small 12 x 12 run-in shelter. On reflecting about the use of that, we decided to make it a bit larger and go with a 12 x 30 small barn instead. There will be room for 2 stalls of 12 x 12 size OR 4 stalls of 6 x 12 (mini horse) size OR 1 large run-in area of 12 x 24 size, OR a combination of those sizes, with a solid walled 6 x 12 feed room. The stall area will be divided off by gates and/or round pen panels, so the entire stall area can be rearranged to meet whatever current need we have for it! It will be perfect for weaning the mini foals in. Perfect for 2 full sized horses to spend the nights in. Perfect for storing shavings/sawdust in, etc. The uses are numerous!
We also decided to tackle this build ourselves. Since it was a small shelter, we figured it was within our abilities. The blogs for the next few entries will reflect this building journey and I'll share the path that we chose to go down on putting up this addition! Perhaps it may give you a few ideas for your own run-in shed or small barn!
The first thing you need to do, is check with your county and see if a building permit is needed. In our county, if it is a barn/farm building, then no building permit is needed. Then we drew out our planned building on paper, with lengths noted, post heights noted, etc. This allowed us to make a shopping list for our supplies.
We began with marking and digging the holes for our support posts. Since the internal stall structure will change with need, we opted for more posts than just the basic support posts. We wanted extra posts to secure divider panels to, etc. Before you dig, make sure there are no underground utilities in the area! Often times people forget about where their electric or water lines to the barn are located!! Make sure you are well clear of those areas before you dig your post holes!! We put in the posts, made sure they were straight, tamped some dirt around the bottoms and then put in a bag of quickcrete in each hole. We put the quickcrete in dry and added water to the mixture after it was in the hole. We then let those posts stand quietly and the concrete dry for several days.
 |
| Posts set and concrete added. Just waiting a few days for it all to set up and harden well. |
After the concrete was dry, we put up our brace boards between all the posts. This was a bit of a challenge! We wanted the front posts to be 6 inches higher than our very back posts, to give us a 6 inch drop for water to run off the roof. (That small of a drop is fine for our area....we get very, very little snow each year! In snowy areas, you'll need to check with your local builders to see what they recommend for a roof slant.) You would think that by leveling each brace board that goes between the posts, that you would have a square and even design. Unfortunately, that did not happen for us! I have a suspicion that it has to do with the fact that our ground is not perfectly level to begin with!
So my best advice, would be to put your brace boards across the front posts at the height that you would like them to be at and then level each of those boards. Then place a temporary board between the front post and the next post back. Level it and mark the top of that brace board (for us, this was our middle post). Measure down the correct distance and mark where the top of the board should be placed. Then repeat that procedure for the next line of posts back, etc. For instance, in our case, we had 3 lines of posts. Front, middle and back. Our front posts were 9 feet 6 inches high. Our middle posts should have been 9 feet 3 inches high. Our back posts should have been 9 feet even. This would give us our 6 inch slope for our roof line. You would think just measuring each post the correct height and then placing the brace boards at the top of each post, SHOULD have been the easiest way to achieve our slope! It was NOT!!! Again, I think the fact that the ground was not perfectly level, was the reason it didn't work the way we thought it would. So....this alternate method worked and our roof slopes fine.
Then we needed to cut off the posts to the correct heights. You can do this before or after you place the brace boards up....it's up to you and how comfortable you are with your cutting device! We opted to mark the posts with the brace boards held temporarily in place. We placed them at the desired location and ran a marker across the post, along the top of the board. This marked our post with the proper slope we needed to cut it at. Then we used a chain saw to cut the tops off the posts. It was pretty accurate and was a MUCH faster way than using a circular saw for this task!
After the tops of the posts were cut off and the brace posts attached, it was time for the rafters. We used 2 x 4 treated lumber. We opted to lay them flat, with the 4 inch width against the brace posts, instead of having them on end. We did this for 2 reasons: we didn't want as much air/vent space at the top of the rafters and we wanted more of a surface to nail our OSB boards to. We left a 3 foot overhang at the front of the barn and a 1 foot overhang at the back. This will hopefully keep rain from blowing into the front of the stall and keep it from dripping directly down on the back of the barn.
 |
| Posts up, brace boards in place and rafters going up. |
With all of the rafters in place, it was time for the OSB (like plywood) to go up. We opted to put this up along with the metal roofing, in order to insulate the barn a little bit. Having the wood underneath the metal roof will help to keep the barn a bit cooler and will also help to greatly reduce the noise when it rains! Since there will be young horses kept in this barn often, we wanted it as quiet as we could get it during storms.
We used 2 sheets of the OSB board to make up one row. We placed it long way from front to back. This gave us 16 feet of roof to cover. (12 feet of stall area, plus 3 foot overhang in front and 1 foot overhang at the back.) We did have to cut some off of the side, as it didn't come out to be a perfect fit that way.
 |
| Back row of the OSB boards going up on the roof. About 3/4 of that row is finished here. To get them on the roof, we backed the truck as close to the side of the building as we could. Then we lifted up the 8 foot board and pushed it up onto the roof. We used ladders to climb up to get it properly placed on the first few boards. After that, one person sat on the roof to work and the other stood on a ladder to assist from the ground. |
Once the OSB boards were all in place, we put on the black roof paper, to seal the roof against moisture. We rolled it out across the roof going left to right (so going longways on the roof). We overlapped each row by about 3 inches. Each row was also stapled in place. We opted for the stronger paper....so when we walked across it, it held up and wouldn't tear.
On each end, we left about 2 or 3 inches hanging over and stapled that down also.
 |
| Roof covered in black roofing paper. The wrinkles are because the roof sat overnight and the dew made it slightly bubbled like that. As the sun came up, it went back down flat. |
 |
| Black roof paper hanging over edges of roof a bit. We stapled this down also. |
 |
| Drip edge (silver colored metal strip) going up. |
 |
| Drip edge going in place. |
 |
| The drip edge wrapping around the corner. |
Now it was time for the metal roofing to go up! For easier handling, we chose to use an 8 foot piece of metal and a 10 foot piece of metal, to make up one row (front to back). These smaller pieces were easier for us to transport and handle, rather than going with a 16 foot long solid piece!!
We did overlap the 2 pieces in each row by a couple of feet. We also allowed the metal to slightly hang over the edges of the OSB board in the front and back by a couple of inches. The screws we used to attach the metal sheets have a washer on them, to help seal the screw holes against water.
 |
| Metal roofing in place. |
Monday, August 29, 2016
No post until September 12th!
We've been on the go the last couple of weeks and the travel will continue another week or so. Due to this, the next blog on building a run-in shed will come out on September the 12th. Sorry for the delay!
Monday, August 15, 2016
Sauce Maker Appliance makes quick work of tomatoes!
This year I updated some of my appliances for preserving food. One of the purchases was the Ball FreshTech HarvestPro Sauce Maker. This is the EASIEST thing to use and makes very quick work of skinning, de-seeding and juicing tomatoes!! It is also easy to clean as well. I can highly recommend adding this to your arsenal of kitchen appliances.
I have no financial interest in this product or this company, I am just relating my wonderful experience with it. I purchased it on sale at the beginning of the season (in May) for $99.99. Regular price is $149.99. Here's the website:
http://www.freshpreserving.com/ball-freshtech-harvestpro-sauce-maker-1034049VM.html#start=1
You simply wash the whole tomatoes, core and cut them into quarters and heat in a pan. Once heated thoroughly, you put them into the sauce maker and process. 6 quarts of juice took me MAYBE 30 minutes to process! That included heating the tomatoes to begin with!
The above photo shows the how easy this appliance is to operate! You place the cut up, heated tomatoes into that top bin. Place your "scraps" bowl (seed and skin bowl, which is my white bowl here) at the end, place another bowl under the juice "spout" as shown (glass bowl here) and turn on the sauce maker! VERY quickly, you've got your juice ready to can or cook with! The appliance also has a larger setting, for allowing chunks of tomatoes, onions, etc to come through. I have not tried that setting yet, so can't comment on how well that works.
The left over scraps, I feed to our chickens. They LOVE this stuff! I'm sure pigs would like this too.
I've found this addition to our kitchen to be very, very helpful and well worth the cost! Canning season is slowing down for us here in the south. Now it's beginning to cool off a bit. Next blog will begin a series on putting up your own small barn or run-in shed. That will come out August 29th. I hope you are enjoying your summer and are having a great canning season!
 |
| The HarvestPro Sauce Maker. LOVE this kitchen appliance! |
 |
| The sauce maker assembled. |
I have no financial interest in this product or this company, I am just relating my wonderful experience with it. I purchased it on sale at the beginning of the season (in May) for $99.99. Regular price is $149.99. Here's the website:
http://www.freshpreserving.com/ball-freshtech-harvestpro-sauce-maker-1034049VM.html#start=1
You simply wash the whole tomatoes, core and cut them into quarters and heat in a pan. Once heated thoroughly, you put them into the sauce maker and process. 6 quarts of juice took me MAYBE 30 minutes to process! That included heating the tomatoes to begin with!
 |
| Box of tomatoes bought from the local farmer's market for $10! |
 |
| Sauce maker in action. |
The left over scraps, I feed to our chickens. They LOVE this stuff! I'm sure pigs would like this too.
 |
| Scraps neatly contained and ready to carry out to the chickens! |
I've found this addition to our kitchen to be very, very helpful and well worth the cost! Canning season is slowing down for us here in the south. Now it's beginning to cool off a bit. Next blog will begin a series on putting up your own small barn or run-in shed. That will come out August 29th. I hope you are enjoying your summer and are having a great canning season!
Monday, August 1, 2016
A couple of quicker and easier ways to freeze sweet corn!
If you've ever had fresh sweet corn from the garden, you are probably hooked and willing to work to freeze it yourself for use this winter! It tastes SO much better than the store bought cans of kernel corn. Normally, most articles you read will tell you to blanch the corn first, before cutting it off the cob and freezing it. Wouldn't it be nice to be able to just freeze it WITHOUT blanching?? Think of the time you would save!
Years ago, my mom tried freezing corn-on-the-cob without blanching and it worked just fine! In fact, we enjoyed the texture of it better than blanched corn that was frozen. The unblanched frozen corn (to us anyway) resembled the texture and taste of fresh corn more accurately than the blanched frozen corn did. From everything I've been able to read and question, unblanched frozen corn does not seem to pose a safety concern either.
There are 2 methods that I've used myself. The first is the absolute quickest and easiest. Take your sweet corn, wrap it in aluminum foil to completely cover it (WITH the shuck still on!) and throw it in the freezer! When you get ready to cook it, loosen one end of the foil and loosen the pointed tip of the shuck, run a little cool water into the end of the corn, then wrap the foil back up and place it on the grill to cook. OR you can take the foil off, loosen the pointed end of the shuck and run the cool water in, wrap the corn in a paper towel and cook it in the microwave for about 5 minutes. Be careful when you remove the shuck! It will be HOT and steamy!
The other method I've tried of freezing corn without blanching is a bit more time consuming (because I cut it off the cob), but it tastes just as good! Just shuck the corn, clean all the "hairs" off the corn, wash the cob in cool water, then cut the corn off the cob, spoon the corn kernels into a freezer container and freeze!
If you've read my previous blogs, you'll remember that I have RA now (rheumatoid arthritis). It's harder for me to use my hands in a physical way. Cutting the corn off the cob is hard for me to do with just a knife. I started looking around and I found THE best device to cut the kernels off the corn cob! It's currently priced at $9.99 and comes from Carol Wright Gifts. I know, you're thinking it won't be sturdy (it is made of mostly plastic). Well, I've finished putting up our sweet corn this year and it held up just fine and is stored away now, waiting for use next season! Here's the link to the corn cutter's page (they call it a corn stripper):
http://www.carolwrightgifts.com/corn-stripper/80342.cfm?key=5G00236B&cm_mmc=PaidSearch-_-GooglePLA-_-FreeShip-_-80342&gclid=CJus7MXKh84CFdU6gQod6WEOAg
Here are some pictures of it. It's EASY to use, easy to clean, keeps the kernels from going all over the place and works for both uncooked AND cooked corn on the cob!
 So now, you have left over husks and cobs with most of the corn cut off of them. What do you do with this stuff? If you live on a farm, feed it to your livestock! Pigs LOVE this stuff, cows like it too and some horses like it, as well as your chickens! You may need to cut up the cobs into smaller bites for the horses, chickens and pigs. I feed it to the horses like a treat. Most of them really like it, but there are a couple that turn their noses up at it! For our full sized horses, I cut the cobs into pieces that are about 2 inches long. For the miniature horses, I then cut that 2 inch long piece into halves (much easier for them to chew). For the chickens, I then cut that 2 inch long half piece into half again. As for the husks, I just put them out on the ground and let them forage through them. Horses can be picky about the husks especially! Our Saddlebreds won't eat them. The Arabians love them. The miniatures have to be in the mood to eat them! LOL It's safe for them to eat. Just don't feed them too many husks or cobs at once. I limit the full sized horses to 2 cobs each/per day. The minis get less than that. If you have a horse that has foundered, probably better to not give them any cobs at all.
**Important Reminder!** If you save the cobs to feed to livestock later on (more than a day later), be sure to keep the cobs in the refrigerator. They can (and will) mold if left at room temperature for over a day. NEVER feed molded cobs to any livestock. It can make them sick.
**Another important reminder!** Never feed anything to someone else's animals, without their permission. Meaning, if you live next to livestock, do NOT just throw this stuff over the fence. You can make the animals very sick. Some of them can be allergic to certain foods, just like you are! ALWAYS ask the owner first, if it's OK to give something to their animals. PLEASE, YOU MUST ALWAYS ASK FIRST!!
That's it for this blog's helpful, time saving hints! Next blog will look at another new appliance I added to the food preserving line-up this summer, a sauce maker! I love it too! Until then, happy freezing and canning! (Next blog due out Monday August 15th.)
Years ago, my mom tried freezing corn-on-the-cob without blanching and it worked just fine! In fact, we enjoyed the texture of it better than blanched corn that was frozen. The unblanched frozen corn (to us anyway) resembled the texture and taste of fresh corn more accurately than the blanched frozen corn did. From everything I've been able to read and question, unblanched frozen corn does not seem to pose a safety concern either.
There are 2 methods that I've used myself. The first is the absolute quickest and easiest. Take your sweet corn, wrap it in aluminum foil to completely cover it (WITH the shuck still on!) and throw it in the freezer! When you get ready to cook it, loosen one end of the foil and loosen the pointed tip of the shuck, run a little cool water into the end of the corn, then wrap the foil back up and place it on the grill to cook. OR you can take the foil off, loosen the pointed end of the shuck and run the cool water in, wrap the corn in a paper towel and cook it in the microwave for about 5 minutes. Be careful when you remove the shuck! It will be HOT and steamy!
The other method I've tried of freezing corn without blanching is a bit more time consuming (because I cut it off the cob), but it tastes just as good! Just shuck the corn, clean all the "hairs" off the corn, wash the cob in cool water, then cut the corn off the cob, spoon the corn kernels into a freezer container and freeze!
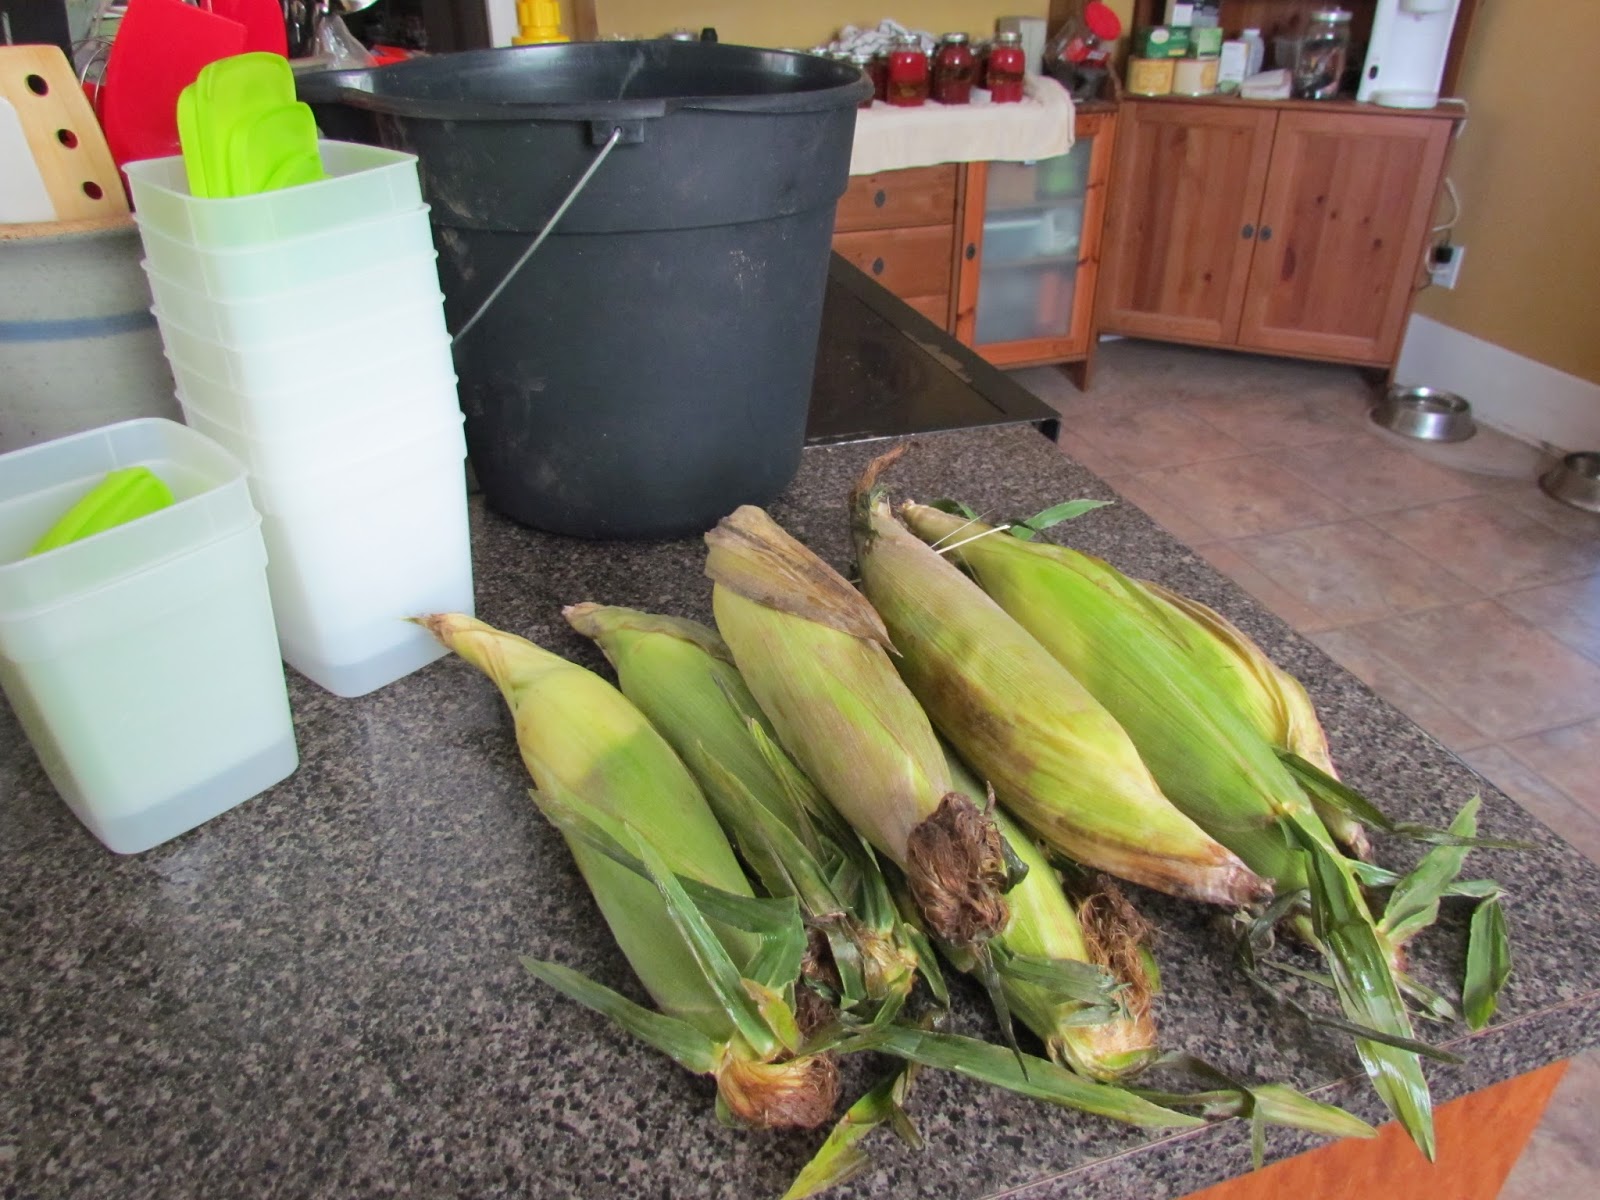 |
| Corn-on-the-cob with it's shucks still on. |
 |
| The "hairs" that need to be removed from the corn before cutting it off the cob. |
If you've read my previous blogs, you'll remember that I have RA now (rheumatoid arthritis). It's harder for me to use my hands in a physical way. Cutting the corn off the cob is hard for me to do with just a knife. I started looking around and I found THE best device to cut the kernels off the corn cob! It's currently priced at $9.99 and comes from Carol Wright Gifts. I know, you're thinking it won't be sturdy (it is made of mostly plastic). Well, I've finished putting up our sweet corn this year and it held up just fine and is stored away now, waiting for use next season! Here's the link to the corn cutter's page (they call it a corn stripper):
http://www.carolwrightgifts.com/corn-stripper/80342.cfm?key=5G00236B&cm_mmc=PaidSearch-_-GooglePLA-_-FreeShip-_-80342&gclid=CJus7MXKh84CFdU6gQod6WEOAg
Here are some pictures of it. It's EASY to use, easy to clean, keeps the kernels from going all over the place and works for both uncooked AND cooked corn on the cob!
 |
| The corn cutter/stripper assembled and ready to use. |
 |
| Corn cob placed in the cylinder, getting ready to cut the corn off. |
 |
| Before you place the cob into the cylinder, make sure the end is flat. Otherwise, it won't seat itself properly and will make the process difficult (if not impossible). Just take a knife and cut this end off. |
 |
| Place the metal hollow "rod" over the end of the cob. |
 |
| Push the plastic "prongs" down onto the top of the cylinder. Then push down on the metal "rod" (which has cutting teeth on the end of it). This will cut the kernels off the cob. You can twist the metal rod as you push down or you can just push straight down (if you are strong enough). |
 |
| After you remove the metal "rod", your cob will come out inside the "rod', leaving the kernels of corn in the cylinder. Empty them out into a bowl (if you are freezing them) or empty them directly onto your plate if you have already cooked the corn! |
 |
| You can see the cob sticking out the end of the metal "rod". By placing the yellow "tamper" into the end of the rod, you can force the cob out the other end. |
 |
| Left over cobs. You can see just a tad bit of corn left on the cob (at the small end). If you want to cut that off with a knife, you can. It doesn't leave very much on there though. |
We like to add red bell peppers to our sweet corn. You can do that now, before you freeze it, or you can add them in later when you cook the corn. Your choice and it works fine either way.

**Important Reminder!** If you save the cobs to feed to livestock later on (more than a day later), be sure to keep the cobs in the refrigerator. They can (and will) mold if left at room temperature for over a day. NEVER feed molded cobs to any livestock. It can make them sick.
**Another important reminder!** Never feed anything to someone else's animals, without their permission. Meaning, if you live next to livestock, do NOT just throw this stuff over the fence. You can make the animals very sick. Some of them can be allergic to certain foods, just like you are! ALWAYS ask the owner first, if it's OK to give something to their animals. PLEASE, YOU MUST ALWAYS ASK FIRST!!
That's it for this blog's helpful, time saving hints! Next blog will look at another new appliance I added to the food preserving line-up this summer, a sauce maker! I love it too! Until then, happy freezing and canning! (Next blog due out Monday August 15th.)
Monday, July 18, 2016
New electric water bath canner is a great idea!!
I decided to add an electric water bath canner to my canning equipment this year. I can't tell you enough, what a great idea this was!! It is a HUGE time saver! I purchased it at the end of May/first of June on sale for $99.99 (normally priced at $149.99). I purchased it from Ball. It's one of their FreshTech appliances. Here's the website:
http://www.freshpreserving.com/ball-freshtech-electric-water-bath-canner-%2B-multicooker-1034047VM.html#start=2
I had always used the traditional stovetop water bath canner. This took up so much room on my stovetop, that I honestly couldn't cook or work around it! It also took FOREVER to heat up to boiling and I had to heat up my jars in another appliance.
The new electric canner sits by itself, on your countertop. If you can place it near the sink, that makes clean up even that much faster and easier. Just plug it in and you are ready to go!
You can see the thermostat on the front here. To pre-heat your jars, you set it for medium-high. At this setting, you place your water filled jars into the water bath and let them sit in there to heat up, with the glass lid in place on the canner. When the jars are heated, you are ready to fill them. While you are filling a jar, the others remain in the hot water to keep them heated. When you are ready to fill a jar, you simply remove the jar from the hot water bath, empty the hot water out of the jar, fill the jar with your food item and place your lids on, then replace the filled jar into the water bath canner. When all jars are filled, you turn the thermostat dial to "CANNING" to process the jars. EASY and quick!!
Once all jars are filled, you place this metal "plate" on top of the jars, then place the glass lid on top of the canner and turn the dial to CANNING. Wait for the water to boil (easily seen through the glass lid) and at that time, set your timer for the correct processing time for your recipe. Again, so easy and quick!
When the processing time is complete, turn off the canner, remove the glass lid and metal plate and let the jars stand for 5 minutes. When that time is up, remove the jars from the canner and place on a towel to cool. Let the water cool down in the canner, then if you have placed the canner next to your sink, you simply open the spout on the side to drain the water! Quick, easy and efficient! I LOVE this canner!!
Now I was sold on just these benefits alone. However, it does SO much more! You can also cook with this thing!! Boil seafood, make big pots of soup, make hot holiday drinks (that are easily dispensed through the spout), etc, etc. And no, I do not have any financial interest in either this company or this appliance. I just honestly love this appliance that much!! I am SO happy I found this and decided to try it out!!
Until next time, I hope your summer days are fun and not too hot! Enjoy!! (Next blog will be due out on Monday August 1st. We will discuss freezing corn.)
http://www.freshpreserving.com/ball-freshtech-electric-water-bath-canner-%2B-multicooker-1034047VM.html#start=2
I had always used the traditional stovetop water bath canner. This took up so much room on my stovetop, that I honestly couldn't cook or work around it! It also took FOREVER to heat up to boiling and I had to heat up my jars in another appliance.
 |
| Traditional stovetop water bath canner. |
The new electric canner sits by itself, on your countertop. If you can place it near the sink, that makes clean up even that much faster and easier. Just plug it in and you are ready to go!
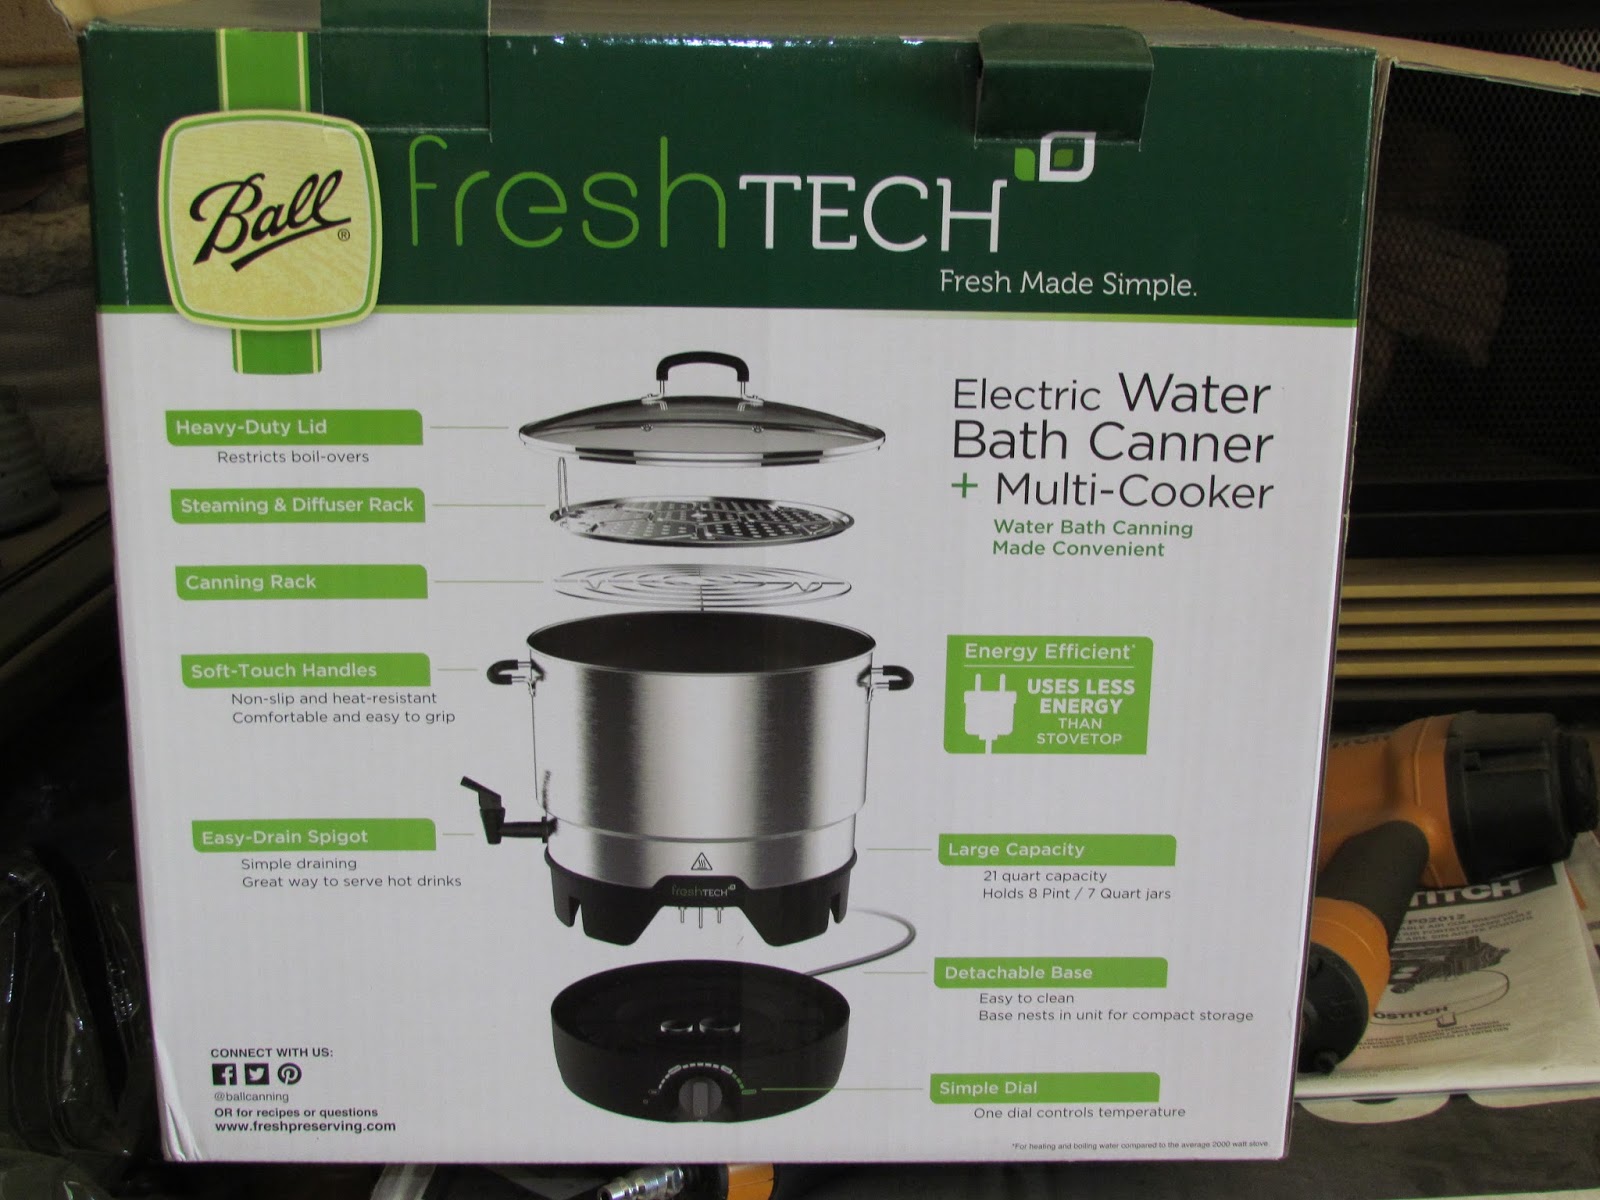 |
| Electric water bath canner box. |
 |
| The electric water bath canner out of the box. |
You can see the thermostat on the front here. To pre-heat your jars, you set it for medium-high. At this setting, you place your water filled jars into the water bath and let them sit in there to heat up, with the glass lid in place on the canner. When the jars are heated, you are ready to fill them. While you are filling a jar, the others remain in the hot water to keep them heated. When you are ready to fill a jar, you simply remove the jar from the hot water bath, empty the hot water out of the jar, fill the jar with your food item and place your lids on, then replace the filled jar into the water bath canner. When all jars are filled, you turn the thermostat dial to "CANNING" to process the jars. EASY and quick!!
 |
| Heated jars in the electric canner, that are in the process of being filled. You can see the 3 empty jars in the foreground. |
Once all jars are filled, you place this metal "plate" on top of the jars, then place the glass lid on top of the canner and turn the dial to CANNING. Wait for the water to boil (easily seen through the glass lid) and at that time, set your timer for the correct processing time for your recipe. Again, so easy and quick!
 |
| The metal "plate" that covers the jars while processing. This helps to distribute the heat more evenly and quickly, plus helps keep your jars in place better during the boiling process. |
When the processing time is complete, turn off the canner, remove the glass lid and metal plate and let the jars stand for 5 minutes. When that time is up, remove the jars from the canner and place on a towel to cool. Let the water cool down in the canner, then if you have placed the canner next to your sink, you simply open the spout on the side to drain the water! Quick, easy and efficient! I LOVE this canner!!
 |
| It's hard to see the black spout on the side, over the edge of the sink, but it's there. Just open it and drain the water into the sink! |
Now I was sold on just these benefits alone. However, it does SO much more! You can also cook with this thing!! Boil seafood, make big pots of soup, make hot holiday drinks (that are easily dispensed through the spout), etc, etc. And no, I do not have any financial interest in either this company or this appliance. I just honestly love this appliance that much!! I am SO happy I found this and decided to try it out!!
Until next time, I hope your summer days are fun and not too hot! Enjoy!! (Next blog will be due out on Monday August 1st. We will discuss freezing corn.)
Subscribe to:
Posts (Atom)